Ball Launch

Activity Description

Learning Goals

  • Understand how the following effect motion of a projectile:
    • Launch angle
    • Launch velocity
    • Free fall acceleration
  • Use vectors to describe the motion of a block on a ramp and the forces acting upon it
  • Apply Newton's 2nd Law to relate the acceleration of a block on a ramp to the forces acting on it ( HS-PS2-1)

Prior Knowledge Required

  • 2-Dimensional kinematics
    • Projectile motion
  • Newton's 2nd Law
  • Drag

Code Manipulation

  • Interpretation of preexisting code
  • Changing values of given code

Activity

Handout

Ball Launch

Part 1

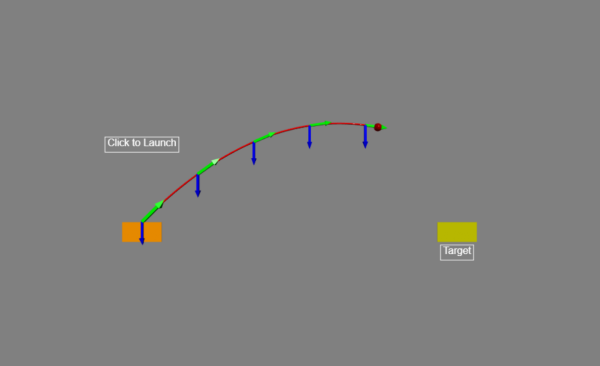
Copy and paste the code from this GlowScript program. Click the button to launch the ball. Your goal is to hit the target.

  1. What 3 variables can you change that might enable the ball to hit the target? Ignore drag for right now.
    1. Variable 1:
    2. Variable 2:
    3. Variable 3:
  2. Now edit these variables and run the program until the ball successfully hits the target. Repeat twice more with different combinations of variables. Record your trials below:
Successful Attempt 1 Successful Attempt 2 Sucessful Attempt 3
Variable 1 1. 1. 1.
Variable 2 2. 2. 2.
Variable 3 3. 3. 3.
Part 2

Answer the following questions that are related to the program and projectile motion.

  1. What do the green arrows represent? How do they change over time?
  2. What do the blue arrows represent? How do they change over time?
  3. How does changing the mass of the ball affect the motion of the ball and the size of the arrows?
Part 3

Extra: Within the code you’ll find a reference to the drag coefficient (line 27). Change the value to something between 0.01 and 0.001. Click to “Run this program”.

  1. Describe how the motion is different now that drag is incorporated into the program
  2. How are the blue arrows different from the trials without drag?
  3. Now, with drag included, modify the variables until the ball hits the target again, and record your results in the table below:
Successful Attempt 4
Variable 1 1.
Variable 2 2.
Variable 3 3.
Variable 4 (Drag) 4.

Code

Link

  1. GlowScript 2.7 VPython
  2. get_library('https://rawgit.com/perlatmsu/physutil/master/js/physutil.js')
  3.  
  4. #objects
  5. x = 0
  6. y = 0
  7. ball = sphere(pos=vector(x,y,0), radius=10, color=vector(1,0,0), texture=textures.rough, make_trail=True)
  8. ballmass = 1
  9.  
  10. platform = box(pos=vector(0,-25,0), length=100, height=50, width=1, color=color.orange)
  11. pL = label(pos=vector(0,200,0), text='Click to Launch', space=30, height=16, border=4, font='sans')
  12.  
  13. target = box(pos=vector(800,-25,0), length=100, height=50, width=1, color=vector(0.8,0.8,0))
  14. tL = label(pos=vector(800,-75,0), text='Target', space=30, height=16, border=4, font='sans')
  15.  
  16.  
  17.  
  18. #Window setup
  19. scene.range = 480
  20. scene.center = vector(400,100,0)
  21. scene.width = 960
  22. scene.height = 600
  23. scene.background = vector(0.5,0.5,0.5)
  24.  
  25. #Parameters and Initial Conditions
  26. g = vector(0,-10,0) #Free Fall acceleration
  27. b = 0 #Drag coefficient
  28.  
  29.  
  30. #Time and time step
  31. t = 0
  32. tf = 10
  33. dt = 0.01
  34.  
  35. #velocity
  36. v0 = 100
  37. theta = 45
  38. vx = v0*cos(theta*pi/180)
  39. vy = v0*sin(theta*pi/180)
  40. ballv = vector(vx,vy,0)
  41.  
  42. #motion map
  43. motionmapv = MotionMap(ball, tf, 5, markerScale=.8, markerColor=color.green, labelMarkerOrder=False)
  44. motionmapa = MotionMap(ball, tf, 5, markerScale=6, markerColor=color.blue, labelMarkerOrder=False)
  45.  
  46. #graph
  47. gd = graph(width=600, height=250, title='<b>Horizontal Range vs. Time</b>',
  48. xtitle='<i>time</i>', ytitle='<i>Horizontal Range</i>',
  49. foreground=color.black, background=color.white,
  50. xmin=0, xmax=15, ymin=0, ymax=1000)
  51. rangecurve = gcurve(color=color.red)
  52.  
  53. gd = graph(width=600, height=250, title='<b>Height vs. Time</b>',
  54. xtitle='<i>time</i>', ytitle='<i>Height</i>',
  55. foreground=color.black, background=color.white,
  56. xmin=0, xmax=15, ymin=0, ymax=1000)
  57. heightcurve = gcurve(color=color.green)
  58.  
  59. ev = scene.waitfor('click')
  60.  
  61. while ball.pos.y >= 0:
  62. rate(500)
  63.  
  64. Fgrav = ballmass*g
  65. Fnet = Fgrav
  66.  
  67. balla = Fnet/ballmass
  68.  
  69. ball.pos = ball.pos + ballv*dt
  70. ballv = ballv + balla*dt
  71.  
  72. motionmapv.update(t, ballv)
  73. motionmapa.update(t, balla)
  74.  
  75. rangecurve.plot(t,ball.pos.x)
  76. heightcurve.plot(t,ball.pos.y)
  77.  
  78. t = t + dt
  79.  
  80. print (x)
  81. print (y)
  82. print (vx)
  83. print (vy)
  84. print (t)

Answer Key

Handout

Part 1
  1. The three variables:
    1. Initial Speed (line 36)
    2. Launch Angle (line 37)
    3. Free Fall Acceleration (Line 26)
  2. Possible results:
Successful Attempt 1 Successful Attempt 2 Successful Attempt 3
Initial Speed (m/s) 95 90 115
Launch Angle (°) 60 45 30
Free Fall Acceleration (m/s2) -10 -10 -14
Part 2
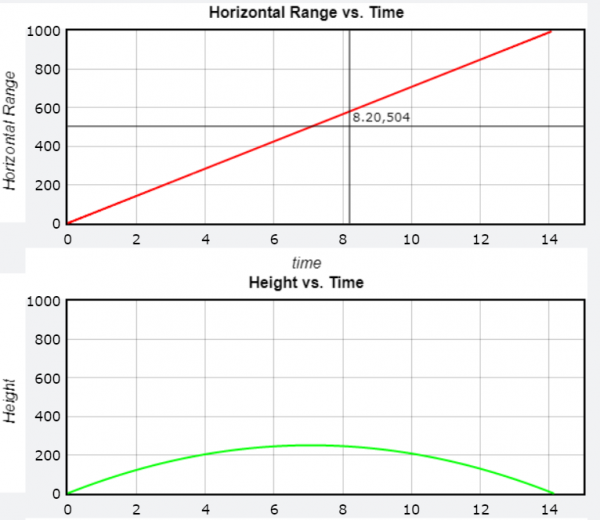
  1. The green arrows represent the velocity of the ball. They start out large, decrease in size, then get large again. They always point in the direction that is tangent to the path of the ball. This is consistent with the fact that the velocity of the ball slows down and then speeds up as it flies through the air
  2. The blue arrows represent the acceleration of the ball. They stay the same size for the entire trip and always point downwards. This is consistent with the fact that the only force, and thus acceleration, acting on the ball is gravity
  3. Changing the mass of the ball has no effect on the motion of the ball, nor the size of the arrows. This is because the acceleration stays the same; a heavier ball experiences a greater gravitational force, and the ratio between force and mass (which is the definition of acceleration) is always constant. The velocity is the same as dictated by the code, although in a real setting a heavier ball would have to be pushed harder to achieve the same velocity.
Part 3
  1. The ball will not fly as far. While the original flight path (sans drag) is a symmetrical parabola, the new flight path (with drag) starts relatively parabolic but becomes compressed or squished towards the end
  2. The blue arrows now represent the acceleration caused but the combined effects of gravitational force and drag force (which points opposite the velocity vector). In the first half of the launch, both drag and gravity have downward components creating a large resultant acceleration vector, while in the second half, the drag force points mostly up, thereby summing to a smaller resultant acceleration vector.
  3. Possible results:
Successful Attempt 4
Launch Speed (m/s) 120
Launch Angle (°) 50
Free Fall Acceleration (m/s2) -10
Drag Coefficient (-) 0.008

Code

Link

  1. GlowScript 2.7 VPython
  2. get_library('https://rawgit.com/perlatmsu/physutil/master/js/physutil.js')
  3.  
  4. #objects
  5. x = 0
  6. y = 0
  7. ball = sphere(pos=vector(x,y,0), radius=10, color=vector(1,0,0), texture=textures.rough, make_trail=True)
  8. ballmass = 10
  9.  
  10. platform = box(pos=vector(0,-25,0), length=100, height=50, width=1, color=color.orange)
  11. pL = label(pos=vector(0,200,0), text='Click to Launch', space=30, height=16, border=4, font='sans')
  12.  
  13. target = box(pos=vector(800,-25,0), length=100, height=50, width=1, color=vector(0.8,0.8,0))
  14. tL = label(pos=vector(800,-75,0), text='Target', space=30, height=16, border=4, font='sans')
  15.  
  16.  
  17.  
  18. #Window setup
  19. scene.range = 480
  20. scene.center = vector(400,100,0)
  21. scene.width = 960
  22. scene.height = 600
  23. scene.background = vector(0.5,0.5,0.5)
  24.  
  25. #Parameters and Initial Conditions
  26. g = vector(0,-8,0) #Free Fall acceleration
  27. b = 0.000 #Drag coefficient
  28.  
  29.  
  30. #Time and time step
  31. t = 0
  32. tf = 10
  33. dt = 0.01
  34.  
  35. #velocity
  36. v0 = 60
  37. theta = 55
  38. vx = v0*cos(theta*pi/180)
  39. vy = v0*sin(theta*pi/180)
  40. ballv = vector(vx,vy,0)
  41.  
  42. #motion map
  43. motionmapv = MotionMap(ball, tf, 5, markerScale=.8, markerColor=color.green, labelMarkerOrder=False)
  44. motionmapa = MotionMap(ball, tf, 5, markerScale=6, markerColor=color.blue, labelMarkerOrder=False)
  45.  
  46. #graph
  47. gd = graph(width=600, height=250, title='<b>Horizontal Range vs. Time</b>',
  48. xtitle='<i>time</i>', ytitle='<i>Horizontal Range</i>',
  49. foreground=color.black, background=color.white,
  50. xmin=0, xmax=15, ymin=0, ymax=1000)
  51. rangecurve = gcurve(color=color.red)
  52.  
  53. gd = graph(width=600, height=250, title='<b>Height vs. Time</b>',
  54. xtitle='<i>time</i>', ytitle='<i>Height</i>',
  55. foreground=color.black, background=color.white,
  56. xmin=0, xmax=15, ymin=0, ymax=1000)
  57. heightcurve = gcurve(color=color.green)
  58.  
  59. ev = scene.waitfor('click')
  60.  
  61. while ball.pos.y >= 0:
  62. rate(500)
  63.  
  64. Fgrav = ballmass*g
  65. Fdrag = -b*ballv*mag(ballv)
  66. Fnet = Fgrav + Fdrag
  67.  
  68. balla = Fnet/ballmass
  69.  
  70. ball.pos = ball.pos + ballv*dt
  71. ballv = ballv + balla*dt
  72.  
  73. motionmapv.update(t, ballv)
  74. motionmapa.update(t, balla)
  75.  
  76. rangecurve.plot(t,ball.pos.x)
  77. heightcurve.plot(t,ball.pos.y)
  78.  
  79. t = t + dt
  80.  
  81. print (x)
  82. print (y)
  83. print (vx)
  84. print (vy)
  85. print (t)

See Also

  • repository/ball_launch.txt
  • Last modified: 2021/02/18 19:29
  • by porcaro1