Activity Information
Activity Information
Learning Goals
- Understand how while loops work
- Interpret code
Prior Knowledge Required
- Vectors and Scalars
Code Manipulation
- Interpret code
- Edit existing code
- Copy / paste code
Activity
Handout – Loops, Time, and Iteration
Go to https://trinket.io/ and sign in using Google.
Then, click on this link to open the Activity: Loops, Time and Iteration program. (Remember to “Remix” and save the code to your account.)
Before you follow the instructions on screen or run the code, answer the following questions about the code.
- What is the starting value of t?
- What does t mean? How do you know?
- What does tf stand for? What is its starting value?
- What does dt mean? Why do you think “dt” was chosen as the variable to represent this value?
- Explain the meaning of “while t < tf”.
- How does the value of t get bigger so that the while loop eventually stops running?
- What is the staring position (in the x-direction) of MyBall? Where did you find this information?
- What does PositionChange = vec(1, 0, 0) in line 19 mean? Why can’t PositionChange equal 1 instead of vec(1, 0, 0)?
- Using your answers to the questions above, fill in the first row of the table below with the starting values for the quantities listed.
| Loop | t | tf | dt | MyBall.pos | PositionChange |
| 0 | |||||
| 1 | |||||
| 2 | |||||
| 3 |
- Which values are changed after each loop through the while loop? How do you know?
- Use the coded calculations in the while loop to fill out the table above, adding rows until you come to the end of the while loop. (Remember that a computer only remembers the most recent value of a variable, so only use the most recent values in each new calculation.)
Now run the program. How did you do in predicting the position values of MyBall over the course of the while loop?
Coding Instructions
1) BEFORE you run the program or edit any code, answer the questions above.
2) Run the program.
3) Line 33: Try collapsing the ‘while loop’ by clicking the small arrow next to the line number.
whileloops are used to step through a program and make things move.- As long as the
whilecondition is true, the program will continue to run. In this case, our while loop will run as long ast < tf. - Every step (or iteration) of the ‘while loop’ causes
tto increase bydt.
4) Line 34: Uncollapse the ‘while loop’ and change the rate from 1 to 3. This will make your program run 3 times as fast.
5) Lines 44 and 45: Right now, the program only prints the initial and final data points for t and x. That is because the program thinks these lines are outside of the ‘while loop’, based on the lines’ indentations. Use tab to indent both of these lines so that they are aligned with the lines above them (inside of the ‘while loop’). Make sure to Run the program afterwards.
6) Line 16: Change the starting position of MyBall to be -10 (in the x-direction).
7) Modify your program so that MyBall ends at +10 (in the x-direction), while still starting at -10.
- When coding, sometimes there are multiple ways to accomplish the same goal! For example, you could acheive (6) relatively easily by modifying the
PositionChangein line 19 OR by modifying the value oftfin line 23.
8) Line 25: Change the value of dt to 0.5. This will make the program iterate in half-second steps, rather than 1 second steps.
- A smaller
dtwill make the program more precise and calculate more data, but a smallerdtwill also make the program run slower.
9) BONUS: Set the PositionChange to +4 in line 19, set tf to 10 in line 23, set dt to 1 in line 25, and then copy and paste the following code into line 36. What did this do to your program?
if t >= tf/2:
      PositionChange=vec(-1,0,0)
      MyBall.trail_color=color.magenta
Code
Link – click “remix” to edit and view the code properly
GlowScript 2.7 VPython
#Window setup
scene.range = 6
scene.width = 500
scene.height = 250

# Here is an axis with some labels
xaxis = cylinder(pos = vec(-10,0,0), axis = vec(20,0,0), radius = 0.05)
label_neg10 = label(pos=vec(-10,0,0), text='-10', yoffset=-10, border=1, box=False)
label_neg5 = label(pos=vec(-5,0,0), text='-5', yoffset=-10, border=1, box=False)
label_0 = label(pos=vec(0,0,0), text='0', yoffset=-10, border=1, box=False)
label_pos5 = label(pos=vec(5,0,0), text='+5', yoffset=-10, border=1, box=False)
label_pos10 = label(pos=vec(10,0,0), text='+10', yoffset=-10, border=1, box=False)

# Create a sphere object that leaves behind points as a trail
MyBall = sphere(pos=vec(0,0,0), radius=0.8, color=color.red, make_trail=True, trail_type="points", trail_color=color.yellow)

# Set an amount in (x,y,z) to change the MyBall's position by
PositionChange=vec(1,0,0)

# Set up the time variables for the while loop
t = 0 # initial time (s)
tf = 10 # final time (s)
# dt is the time-step for the program, a smaller number will lead to more steps
dt=1 # time-step (s)

# Print the headers and initial data
print('t ,', 'x')
print(t,',',MyBall.pos.x)
print_options(width=200, height=250) # Sets the height and width of our print box

# While loop which causes our program to run
while t < tf: # The program will run as long as the condition is true
    rate(1) # Defines how fast the program runs


    # Update position of MyBall for each time-step
    MyBall.pos = MyBall.pos + PositionChange*dt

    # Increase the time by one time-step
    t = t + dt

# Print out the data point for this step
print(t, ',', MyBall.pos.x)
Answer Key
Handout
1. 0, see line 22
2. t represents the current time because t is being increased by the time step dt each loop. See line 42.
3. tf stands for “time final,” its value, which won’t change, is 10.
4. dt stands for a small “difference in time.” It represents the time step the model runs in. “dt” was chosen to represent this because dt plays an important and similar role in calculus. The big difference between dt in calculus and dt in our code is that it actually has a value in the code, where it is infinitesimally small in calculus.
5. “while t < tf” is the statement that initializes the while loop. It means that the loop will keep repeating until t < tf is no longer true.
6. Line 42 “t = t + dt” increases the value of t by dt each time the loop iterates.
7. The starting position of MyBall in the x-direction is 0. This is because the position of MyBall is given in line 16.
8. PositionChange = vec(1, 0, 0) represents the velocity of MyBall. Velocity is a vector quantity, so we can’t say that it is equal to 1 because then it would not have a direction.
9.
| Loop | t | tf | dt | MyBall.pos | PositionChange |
| 0 | 0 | 10 | 1 | <0,0,0> | <1,0,0> |
| 1 | |||||
| 2 | |||||
| 3 |
10. t and MyBall.pos are changed each time the loop iterates. See lines 39 and 42
11.
| Loop | t | tf | dt | MyBall.pos | PositionChange |
| 0 | 0 | 10 | 1 | <0,0,0> | <1,0,0> |
| 1 | 1 | 10 | 1 | <1,0,0> | <1,0,0> |
| 2 | 2 | 10 | 1 | <2,0,0> | <1,0,0> |
| 3 | 3 | 10 | 1 | <3,0,0> | <1,0,0> |
| 4 | 4 | 10 | 1 | <4,0,0> | <1,0,0> |
| 5 | 5 | 10 | 1 | <5,0,0> | <1,0,0> |
| 7 | 6 | 10 | 1 | <6,0,0> | <1,0,0> |
| 9 | 7 | 10 | 1 | <7,0,0> | <1,0,0> |
| 8 | 8 | 10 | 1 | <8,0,0> | <1,0,0> |
| 9 | 9 | 10 | 1 | <9,0,0> | <1,0,0> |
| 10 | 10 | 10 | 1 | <10,0,0> | <1,0,0> |
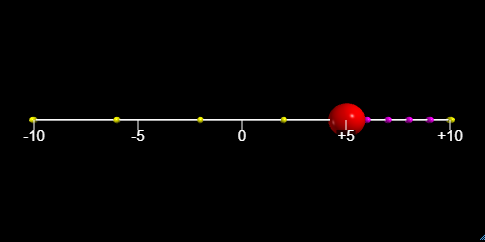
9) (Bonus question) This changed the code so that once MyBall reaches x = 10, the value of PositionChange becomes <-1,0,0>, so MyBall starts moving to the left slower than it was moving to the right. Additionally, the dots te ball was leaving behing for each loop are changed from yellow to magenta.
Code
Link – click “remix” to edit and view the code properly
GlowScript 2.7 VPython
#Window setup
scene.range = 6
scene.width = 500
scene.height = 250

# Here is an axis with some labels
xaxis = cylinder(pos = vec(-10,0,0), axis = vec(20,0,0), radius = 0.05)
label_neg10 = label(pos=vec(-10,0,0), text='-10', yoffset=-10, border=1, box=False)
label_neg5 = label(pos=vec(-5,0,0), text='-5', yoffset=-10, border=1, box=False)
label_0 = label(pos=vec(0,0,0), text='0', yoffset=-10, border=1, box=False)
label_pos5 = label(pos=vec(5,0,0), text='+5', yoffset=-10, border=1, box=False)
label_pos10 = label(pos=vec(10,0,0), text='+10', yoffset=-10, border=1, box=False)

# Create a sphere object that leaves behind points as a trail
MyBall = sphere(pos=vec(-10,0,0), radius=0.8, color=color.red, make_trail=True, trail_type="points", trail_color=color.yellow)

# Set an amount in (x,y,z) to change the MyBall's position by
PositionChange=vec(4,0,0)

# Set up the time variables for the while loop
t = 0 # initial time (s)
tf = 10 # final time (s)
# dt is the time-step for the program, a smaller number will lead to more steps
dt = 1 # time-step (s)

# Print the headers and initial data
print('t ,', 'x')
print(t,',',MyBall.pos.x)
print_options(width=200, height=250) # Sets the height and width of our print box

# While loop which causes our program to run
while t < tf: # The program will run as long as the condition is true
    rate(3) # Defines how fast the program runs

    if t >= tf/2:
      PositionChange=vec(-1,0,0)
      MyBall.trail_color=color.magenta

    # Update position of MyBall for each time-step
    MyBall.pos = MyBall.pos + PositionChange*dt

    # Increase the time by one time-step
    t = t + dt

     # Print out the data point for this step
    print(t, ',', MyBall.pos.x)