Activity Information
Learning Goals
- Develop a computational model of the magnetic field from a moving point charge
- Understand how nested loops work
Prior Knowledge Required
- Vectors
- Cross-Products
- Separation Vectors
- Magnetic field form a moving point charge equation
Code Manipulation
- Interpret existing code
- Edit existing code
- Create code from mathematical equations
- Copy/paste code
Activity
Handout – Visualizing Magnetic Fields
Your school, Gnivri High, has decided to have a field day!
The catch is that instead of doing several track-and-field events, you and your team will be learning about fields in physics. One “event” is the magnetic field.
Your team has been tasked with finishing this code that will show the magnetic field from a moving charge (click “remix” to save your own version). You’ve been given the following set of questions / instructions:
- Without Changning anything in the code, what happens when you run it?
- Read through the code and all the comments.
- What is the first set of loops (lines 24-39) doing collectively?
- What is each of these loops doing specifically?
- Try temporarily adding the code: rate(25) in line 30 to better see what is going on.
- Why are nested loops needed here?
- Use the Right Hand Rule to predict what the magnetic field will look like.
- Change line 54 so it calculates the appropriate separation vector.
- Change line 55 so it calculates the appropriate Magnetic Field.
- Information found here might be useful
- In the for loop, what does obs represent?
- Why do we need nested loops in lines 48-56?
Code
GlowScript 3.1 VPython

#set the view - you might need to adjust this for your screen
scene.range = 10

# lets define some useful constants
mu_0 = 4*pi*(10**-7)  # Magnetic Constant
q = 1          # Charge of the moving particle [C]
dt = 0.01      # Define the time step
scale = 1e8    # Variable to scale up the Magnetic Field arrows

# Object setup
pointcharge = sphere(pos = vec(-7,0,0), radius = 0.5, color = color.red) # Represent the moving charge as a red sphere
velocity = vec(5,0,0) # Give the moving charge a velocity to the right

#observer arrows setup
obslist = []   # Create an empty list that will store all of the observer arrows that will represent the magnetic field
x=-10          # initial x location for the observer arrows
dx = 1         # step in the x direction - how spaced out the observer arrows are left to right

# These loops create all the observer arrows, starting them with a length of zero so they can't be seen
# They also place small white spheres where the arrows are, to make it easier to tell where the arrows are

while x <= 10: # Run this loop until x is >= 10
  theta=0      # Reset the angle
  dtheta=pi/6  # Angle step - in radians, this is equivalent to 30 degrees
  r=3          # Radus for how far away the observer arrows should be from the pointcharge

  while theta < 2*pi: # This is called a "nested" loop because it runs inside of another loop. This one goes around in a circle placing arrows and dots

    obspoint = vec(x,r*sin(theta),r*cos(theta)) # Find the coordinate of the observer location
    field = arrow(pos=obspoint, axis = vec(0,0,0), color = color.orange) # Create an arrow of zero length at the observer location
    obslist.append(field)                       # Add each field arrow to obslist

    dot = sphere(pos=obspoint, radius = 0.05)   # Place a small sphere at each observer location

    theta = theta + dtheta # Increase the angle by dtheta

  x = x + dx               # This is back in the first loop - increase the x direction by dx

# Make the program run after a click
print("Click the program window to run.")
ev = scene.waitfor('click')

#------Everything above this line does not need to be changed------#

# While loop to make stuff happen
while pointcharge.pos.x <= 7: # Run until the point charge gets to x = 7
  rate(100)                   # Tells the computer how fast to run the program
  pointcharge.pos = pointcharge.pos + velocity*dt  # Update the position of the pointcharge

  for obs in obslist: # Nested loop to loop through all the charges. This is a "for loop" meaning it loops over each element in obslist

   rsep = vec(0,0,0)
   B    = vec(0,0,0)
   obs.axis = B*scale # Update the field arrow arrow with the calculated B field times a scaling constant
Answer Key
Handout
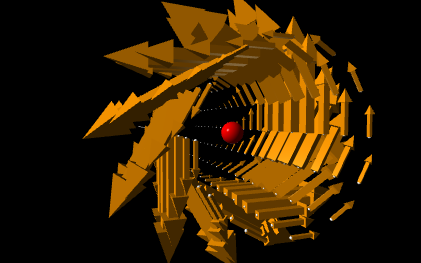
1. A bunch of white dots appear in rings, and a red sphere moves to the right.
2. n/a
3. They are creating all of the white dots and initial field arrows of zero length.
4. The first loop moves each ring of dots/arrows to the right and resets the angle for the nested loop. The nested loop creates a ring of ring of dots/arrows.
5. We need nested loops because we need to make several rings of arrows/dots, not just one.
6. The right-hand rule predicts that the magnetic field will be counterclockwise when viewed from the right:

7. The separation vector is given by:

In this case, r obs is the position of an arrow and r source is the position of the point charge. In the code this looks like:
rsep = obs.pos - pointcharge.pos8. The equation for the magnetic field from a moving point charge is:
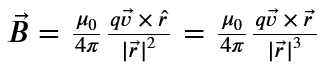
Where r is the separation vector, and the absolute value of r is the length or magnitude of that vector.
Translating this into code looks like:
B = (mu_0/(4*pi))*((cross((q*velocity), rsep))/(mag(rsep)**3))9. obs in the for loop represents an entry in the list obslist, which means it represents one of the arrows.
10. We need nested loops here because the pointcharge is moving, so the magnetic field from it is not constant. This means we have to loop through all the arrows every time the pointcharge moves.
Code
GlowScript 3.1 VPython

#set the view - you might need to adjust this for your screen
scene.range = 10

# lets define some useful constants
mu_0 = 4*pi*(10**-7)  # Magnetic Constant
q = 1          # Charge of the moving particle [C]
dt = 0.01      # Define the time step
scale = 1e8    # Variable to scale up the Magnetic Field arrows

# Object setup
pointcharge = sphere(pos = vec(-7,0,0), radius = 0.5, color = color.red) # Represent the moving charge as a red sphere
velocity = vec(5,0,0) # Give the moving charge a velocity to the right

#observer arrows setup
obslist = []   # Create an empty list that will store all of the observer arrows that will represent the magnetic field
x=-10          # initial x location for the observer arrows
dx = 1         # step in the x direction - how spaced out the observer arrows are left to right

# These loops create all the observer arrows, starting them with a length of zero so they can't be seen
# They also place small white spheres where the arrows are, to make it easier to tell where the arrows are

while x <= 10: # Run this loop until x is >= 10
  theta=0      # Reset the angle
  dtheta=pi/6  # Angle step - in radians, this is equivalent to 30 degrees
  r=3          # Radus for how far away the observer arrows should be from the pointcharge

  while theta < 2*pi: # This is called a "nested" loop because it runs inside of another loop. This one goes around in a circle placing arrows and dots

    obspoint = vec(x,r*sin(theta),r*cos(theta)) # Find the coordinate of the observer location
    field = arrow(pos=obspoint, axis = vec(0,0,0), color = color.orange) # Create an arrow of zero length at the observer location
    obslist.append(field)                       # Add each field arrow to obslist

    dot = sphere(pos=obspoint, radius = 0.05)   # Place a small sphere at each observer location

    theta = theta + dtheta # Increase the angle by dtheta

  x = x + dx               # This is back in the first loop - increase the x direction by dx

# Make the program run after a click
print("Click the program window to run.")
ev = scene.waitfor('click')


# While loop to make stuff happen
while pointcharge.pos.x <= 7: # Run until the point charge gets to x = 7
  rate(100)                   # Tells the computer how fast to run the program
  pointcharge.pos = pointcharge.pos + velocity*dt  # Update the position of the pointcharge

  for obs in obslist: # Nested loop to loop through all the charges. This is a "for loop" meaning it loops over each element in obslist

   rsep = obs.pos - pointcharge.pos                                  # Calculate the separation vector between the observer point and the pointcharge
   B    = (mu_0/(4*pi))*((cross((q*velocity), rsep))/(mag(rsep)**3)) # Calculate the Magnetic field at the observer point
   obs.axis = B*scale                                                # Update the field arrow arrow with the calculated B field times a scaling constant